Visualizzazione post con etichetta Nail Art. Mostra tutti i post

DNA Nitrogeneus Bases

Poiché la mia discontinuità qui e sul canale YouTube è dovuta allo studio, la nail art che vi propongo oggi prende ispirazione proprio da questo!
Sulle due mani, infatti, ho rappresentato le quattro basi azotate che compongono il DNA di tutti gli esseri viventi.

Because my discontinuity here and on my YouTube channel is due to the study, the nail art that I propose today takes inspiration from this!
On both hands, in fact, I have represented the four nitrogenous bases that make up the DNA of all living beings.


La descrizione di ogni base azotata è composta da due disegni: la lettera che identifica ciascuna base (sull'anulare e sul mignolo), ed accanto alla lettera ho riprodotto le corrispondenti strutture chimiche (medio e anulare). 
La divisione delle basi sulle due mani non è casuale. Le basi, infatti, sono soggette a complementarietà, ognuna di esse si lega ad una sola delle altre basi presenti nel DNA, ed io ho scelto di rappresentare una coppia di basi complementari su ciascuna mano.

The description of each nitrogenous base is composed of two designs: a letter that identifies each base (on the ring finger and little finger), and next to the letter I reproduced the corresponding chemical structures (middle and ring fingers).
The division of the bases on two hands is not random. The bases, in fact, are subject to complementary, each of them is linked to one of the other bases in DNA, and I chose to represent a pair of complementary bases on each hand.


Spero che questo piccolo excursus sulla biologia non vi abbia annoiato troppo!
A presto!

I hope that this small digression about biology don't bore you too much!
See you soon!
Stone Marble ft. LadyQueen [Review]

Ciao!
In questo post vi parlerò della mia ultima Nail Art e, in particolare, voglio farvi la recensione di alcuni prodotti che mi sono stati gentilmente offerti dal sito LadyQueen.
La Nail Art di cui parlo è quella che vedete nella foto sottostante. E' stata ispirata dal motivo marmoreo delle mezzeperle che mi sono state inviate. Infatti ho trovato così carine le perline che ho deciso che sarebbe stato proprio il loro disegno il tema centrale delle unghie.
 
Hi!
In this post I will talk about my latest nail art and, in particular, I want you to review some of the products that I have been kindly offered by the site LadyQueen.
Nail art of which I speak is the one you see in the picture below. It 'was inspired by the marbled pattern of half-pearls that were sent to me. In fact I found the beads so cute that I decided it would be their own design the central theme of the nails.
 
Tutorial: https://youtu.be/0kT4zTE1CSI
Ma parliamo un po' delle perle: sono in plastica, molto leggere. Non sono molto grandi (so che dalla foto possono sembrare grandi ma sono le mie unghie che sono piccole).
Io le ho usate con lo smalto e non mi hanno dato alcun problema di sporgenza anche se, certamente, usandole con il gel risultano meno sorgenti.
L'unico "difetto" che hanno non sta nel prodotto ma nella confezione che contiene solo pochi pezzi (10 pezzi).
 
But let's talk about pearls:  are made of plastic, very light. They are not very big (I know that in the photos may look big but are my nails that are small).
I I've used them with nail polish and have not given me any problems of protruding although, certainly, using them with the gel are less prominent.
The only "defect" that is not in the product but in the package that contains only a few pieces (10 pieces).
 
Link
Cliccando sotto la foto accederete automaticamente alla pagina per acquistare le perline sul sito LadyQueen.
Sulla destra nel mio blog, inoltre, trovate un codice che vi da diritto al 15% di sconto sui vostri acquisti. Se 10 persone utilizzeranno il codice,il sito LadyQueen promuoverà un giveaway.
Disclaimer: Non sono pagata da alcuna azienda per mostrare i prodotti nei miei video.
Non ho alcun obbligo nel mostrare o realizzarne un video al fine di mostrarvi prodotti che mi sono stati inviati gratuitamente. Se mostro e uso dei prodotti nei miei video è perché mi piacciono.
Non saranno MAI mostrati prodotti che non mi sono piaciuti o che credo non siano validi.
 
Click under the photo automatically log on the page to buy the beads on the site LadyQueen.
On the right in my blog, also you found a code that give you to 15% off cupon code on your purchases. If 10 people use the code, the site LadyQueen promote a giveaway.
Disclaimer: I am not paid by any company to show the products in my videos.
I have no obligation to show, or create a video to show products were sent to me for free.
If I show and use of the products in my videos is because I like them.
Will NEVER be shown products that I did not like or that I believe are not valid.


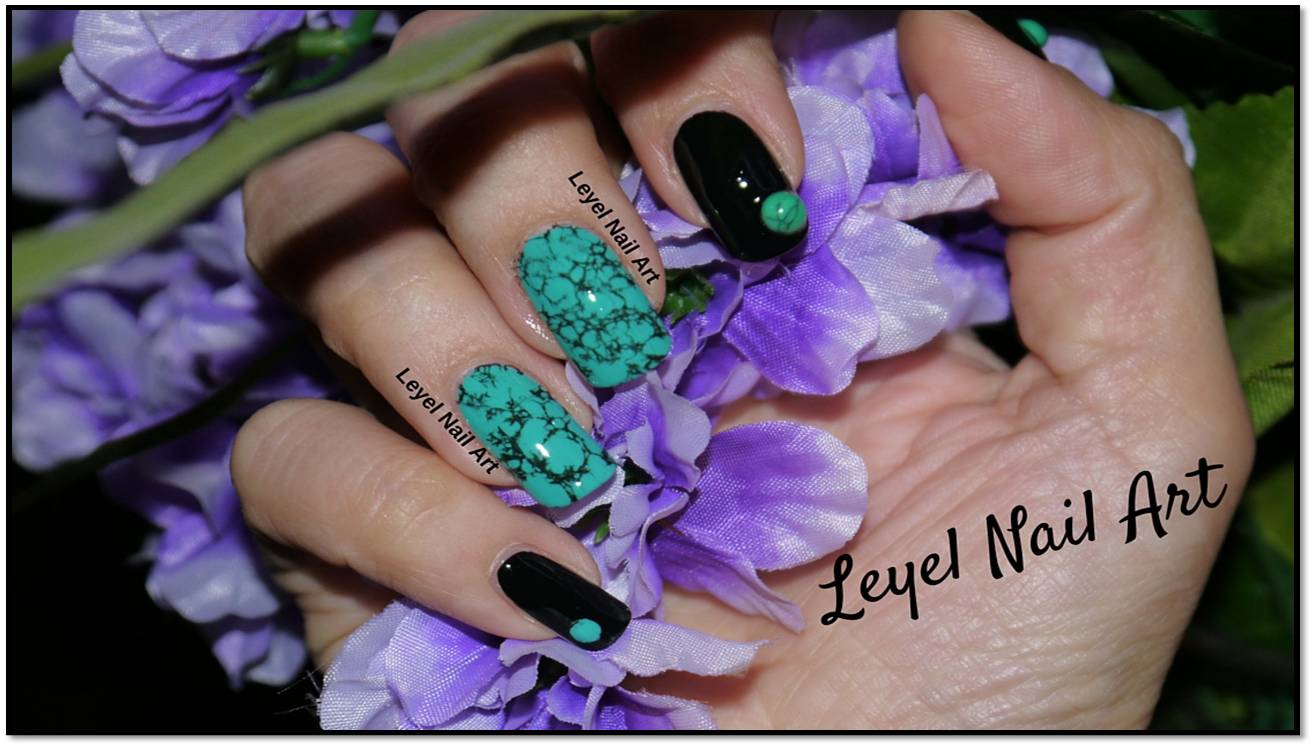
Two Turquoise Nail Art

Ciao a tutti!
Eccomi qui a mostrarvi le mie due ultime Nail Art che hanno entrambe come colore di fondo un bellissimo turchese di cui mi sono veramente innamorata.
Lo smalto, come potete ben vedere dai video, è firmato Layla Cosmetics quindi ottimo per qualità e durata. Ed ecco a voi le Nail Art!
 
Hello everyone!
I'm here to show you my two latest nail art that have as background a beautiful turquoise which I really love.
the Nail polish, as you can see from the video, it is by Layla Cosmetics, very good for quality and durability. And here comes the Nail Art!


Cindarella Nails

Con la consapevolezza che arrivo sempre in ritardo con le mode oggi vi mostro la mia Nail Art a tema Cenerentola.
Per l'uscita del nuovo film Disney, la Essence ha creato una Limited Edition con tutte le immagini del film del 1950.
Ho acquistato solo due cosette di questa collezione (sono stata brava!) ed entrambe le ho usate nel tutorial dedicato.
La cosa più bella cheho acquistato sono stati sicuramente gli Stickers, ma potevo mai usarli senza aggiungere qualcosa di personale!?
Questo è il risultato finale, spero che vi piaccia!
 
 
With the knowledge that always arrive late with trends today I show you my nail art themed Cinderella.
For the release of the new Disney movie, the Essence has created a Limited Edition with all the images of the film of 1950.
I bought only two things of this collection (I was good!) And both have used in the tutorial dedicated.
The best thing that I purchased were the Stickers, but I could never use it without adding something personal!?
This is the final result, I hope you enjoy!
 
https://www.youtube.com/watch?v=D3rSVk9lVzA
 

P2 cosmetics - 020 "Silk" Nail Polish

Oggi vi voglio parlare di un nuovo smalto che ho comprato un po' di tempo fa'. 
Avevo in mente una nail art nei minimi dettagli,poi mi sono accorta di non avere il colore che volevo utilizzare come base,e sono subito corsa ai ripari fiondandomi da Oviesse. 
L'intento era quello di comprare uno smaltino della essence ma, aimè, il colore che volevo non c'era (e non chiedevo la luna sono uno smalto rosato,tipo effetto "fondotinta"!).
Girando tra gli stand, abbastanza depressa per non aver trovato ciò che cercavo mi sono imbattuta in lui: lo stand della p2!

Today I want to talk about a new glaze that I bought a bit time ago.
I had in mind
a nail art in detail, then I realized that I don't have the color that I wanted to use as base, and immediately ran Oviesse for buy it.
The intent was to buy a Esence Nail Polish but,the color I wanted wasn't there (and didn't ask the moon only pink polish, like "foundation"effect!).
Walking through the stands, depressed because I had not found, I have seen the stand of p2!


Avevo già sentito di questa marca,soprattutto su pagine straniere visto che è un marchio tedesco che,fino a pochi mesi fa, era reperibile solo in germania.
Quando mi sono avvicinata allo stand ho visto che aveva prezzi davvero ottimi e in più aveva il colore che mi serviva, come resitere a quel punto? 
Infatti non ho resistito e mi sono regalata "020-Silk" un meraviglioso rosa cipria (a soli 2,99€).
La cosa più entusiasmante di questo smalto è che non necessita di base,anzi! Infatti le specifiche precisano di indossarlo sull'unghia "nuda" poichè nella sua formula sono presenti sostanze nutrienti (un po' come le basi). Questa particolarità è un punto molto positivo per me poichè mi permette di dimezzare i tempi di applicazione,non dovendo aspettare che la base asciughi prima di poter applicare lo smalto. E poi è COPRENTE, ho fatto solo 2 strati non particolarmente abbondanti.
Eccolo in dettaglio:

I had heard of this brand, especially on foreign pages since it is a German brand that, until a few months ago, it was only available in Germany.
When I approached to the stand I saw that he had really good prices and had the color I needed.
I bought "020-Silk" a wonderful powder pink (only € 2.99).
The most exciting thing of this glaze is that it doesn't require a base,on the contrary! In fact, the specifications indicate to wear it on the"naked" nail  because in its formula are nutrients (a bit as the bases).
This peculiarity is a very positive point for me because it allows me to halve the time of application, not having to wait for dry the base before applying the glaze. And then it is OPAQUE, I only did 2 layers aren't particularly generous.
Here it is in detail:


La maggior parte di voi avrà già visto come ho decorato questo bellissimo colore, ma per quelli che se lo sono perso, ecco la Nail Art:
 
Most of you will have already seen how I decorated this beautiful color, but for those who missed it, here is the Nail Art:
 
Tutorial:https://www.youtube.com/watch?v=uVFWXPxKHCM

Che dire di più!? Promosso a pieni voti,non vedo l'ora di provare altre cose di questa marca!
A presto!

What can I say more !? Passed with full marks, I can not wait to try other things of this brand!
See you soon!

Black Cat & Glitter Spiral Nail Art

Eccomi tornata (come al solito dopo tantissimo tempo) per mostrarvi la mia ultime Nail Art.
Avrei voluto fare due post separati ma non ho avuto tempo ( non so per quale motivo mi è tanto difficile scrivere sul blog,invidio molto chi ci riesce! ).
 
I am back (as usual after a long time) to show you my latest nail art.
I wanted to make two separate post but have not had time (I do not know why it is so difficult to write on the blog, I envy much who we can!).
 
[Tutorial: https://www.youtube.com/watch?v=0W-btvYCjIw]
 
Per prima vi mostro la mia creazione per Halloween, lo so che è passato un mese ma comunque è stato solo un caso che abbia trovato il tempo per crearla proprio in vista di questa ricorrenza, infatti l'avevo in mente da tantissimo tempo! Devo dire che questa volta sono molto soddisfatta del risultato. Mi sono divertita molto a fare qualcosa di creativo dopo così tanto tempo (la nail art che avevo caricato sul canale prima di questa era stata fatta con i foil che,non amo particolarmente).
Come tutte le nail art "Fuzzy" anche questa è stata tutt'altro che durevole, consiglio a chiunque voglia sfoggiare nail art"pelose" per un'occasione particolare di non realizzarle con largo anticipo, ma più tardi possibile (già la seconda volta che vi lavate le mani potrete notare che i "pelucchi" iniziano a diminuire).
Una cosa di cui mi sono accorta grazie a questa nail art è che ADORO il matt, infatti anche per la prossima che sto mostrarvi ho usato smalti con aggiunta di Top Coat Matt.
Di certo non è molto elaborata però è molto carina,facile e veloce da fare. Credo che il Matt crei un meraviglioso contrasto con i Glitter che sono così luminosi!
 
First I show my creation for Halloween, I know it's been a month but it was only by chance that he found the time to create it precisely in view of this event, in fact I had in mind for a long time! I must say that this time I am very satisfied with the result. I enjoyed very much to do something creative after so long (the nail art that I had loaded on the channel before this had been done with the foil that do not particularly like).
Like all the nail art "Fuzzy" even this was anything but durable, advice to anyone who wants to show off nail art "hairy" for a special occasion not to implement them well in advance, but as late as possible (already the second time you wash your hands you will notice that the "fluff" start to decline).
One thing I noticed with this nail art is that I LOVE the matt, also for the fact that I'm the next show I used glazes with addition of Matt Top Coat.
Certainly is not very elaborate, however, is very pretty, easy and quick to do. I think the Matt creates a wonderful contrast with Glitter that are so bright!
 
[Tutorial: https://www.youtube.com/watch?v=_kUmrTeBQ0c]
 
Questa Nail Art è stata, a sua volta, ispirata da altre due Nail Art: una di Heavywings e l'altra di Tartofraises.
Anche questa, come la precedente non vincerà il premio "Nail Art più duratura" però può essere ritoccata con facilità se si rovina, quindi con un po' di attenzione potete allungare la sua "vita".
Spero vivamente che le mi ultime creazioni vi siano piaciute!
Alla prossima!
 
This nail art was, in turn, inspired by two other Nail Art: one of Heavywings and the other of Tartofraises.
Even this, as the previous one did not win the prize "Nail Art more durable" but can be touched up easily if you ruin, so with a little 'attention can stretch his "life."
I sincerely hope that you enjoyed my latest creations!
To the next!
 

Haul Ciaté Feathered Manicure

Oggi vi parlo del mio ultimo acquisto da Sephora che,come avete potuto leggere dal titolo, si tratta di un kit Ciaté!
Per la precisione sto parlando di questo deliziosissimo kit che serve a realizzare una manicure usando le piume (le vere piume!!!).

Today I will talk about my latest purchase from Sephora that, as you have read from the title, this is a kit Ciaté! 
To be precise, I'm talking about this scrumptious kit that is used to create a manicure using feathers (the real feathers !!!).


La prima cosa che mi ha colpito di questo kit è quanto esso sia completo. Infatti non necessita davvero di nulla di più rispetto al suo contenuto per la realizzazione della manicure.
Il prezzo è "altino", supera i 20,00 € per il prodotto non in saldo, sicuramente un prezzo "non alto" se si considera la completezza del prodotto, ma è comunque una cifra che non tutti vogliono/possono permettersi per degli smalti.
Ma non parliamo del prezzo pieno,come ho detto all'inizio del post io l'ho preso in saldo pagandolo 6,00€!

The first thing that struck me about this kit is how much it is complete. In fact not really requires nothing more than its contents for the realization of manicure. 
The price is "higher end", exceeds € 20.00 for the product is not on sale, definitely a price "not high" when you consider the completeness of the product, but it's still a figure that not everyone wants / can afford to glazes . But we do not speak of the full price, as I said at the beginning of the post I took it in balance by paying € 6.00!


Qui potete vedere in dettaglio ogni prodotto della scatola che ora passo a descrivervi  nel dettaglio (da destra verso sinistra):
-"Speed Coat Pro" che contiene ben 13.5 ml [ma non so per quale motivo è uscito dalla confezione vagamente giallino]
-"Ciaté Paint Pot" smalto bianco da 5 ml
-"Scissors" forbicine inossidabili
-"Nail File Block" due lime a forma di zolletta di zucchero xD
-"Feathers" piume contenute in una simpatica bustina di plastica rigida

Here you can see in detail each product in the box which I shall now describe in detail (from right to left): 
- "Speed ​​Coat Pro" which contains 13.5 ml well [but I do not know why it came out from the pack vaguely yellow] 
- "Ciaté Paint Pot" white enamel 5 ml 
- "Scissors" stainless 
- "Nail File Block" two files in the form of a lump of sugar xD 
- "Feathers" contained in a nice plastic bag rigid


Ci rivediamo a settembre con un tutorial utilizzando questo kit! ^_^ 

See you in September with a tutorial using this kit! ^_^

Limoni Contest: Cote d' Invoire

Qualche giorno fa, ho visto su Facebook che la profumeria Limoni aveva indetto un contest.
Il tema del contest erano "I Mondiali": chiedevano di rappresentare i colori di una squadra che partecipa ai mondiali.
Verranno poi scelte dallo staff 8 finaliste che si sfideranno a coppie con il metodo dei "Like", creando una sorta di gironi ad eliminazione diretta.
 
Io ho scelto di rappresentare la "Costa D' Avorio" poiché i colori mi ricordavano quelli dell' Italia e mi piaceva tantissimo l'immagine sul gagliardetto, ovvero l'elefante!
 
Passiamo al sodo, eccovi la Nail Art con la quale ho partecipato al contest, spero vi piaccia, a me piace come è venuto l'elefante, per quanto riguarda le altre unghie, sinceramente non sono del tutto convinta.
 
A prestissimo!
 
 
A few days ago, I saw on Facebook that the Limoni beauty store had announced a contest.
The theme of the contest was "The World Cup": asked to represent the colors of a team participating at the world cup.
Will then be chosen by the staff of 8 finalists who will compete in pairs by the method of "Like", creating a sort of knockout rounds.

I have chosen to represent the "Cote D 'Ivoire" because the colors reminded me Italy  flag and I really liked the picture on the pennant, the elephant!

Here's the Nail Art with whom I participated to the contest, hope you like it, I like how I draw the elephant, with regard to the other nails, honestly I'm not entirely convinced.

See you very soon!
 

Wrap Paper Nail Art • Pellicola Trasparente


Eccomi finalmente, dopo tantissimo tempo , a farvi vedere la mia ultima Nail Art.
L' ho realizzata circa 10 giorni fa, ma in questo periodo il tempo scarseggia (infatti come potete notare sono in "pausa" con l'ABC Challange).
E' una Nail Art che volevo realizzare da tempo, è davvero facile e d'effetto, la prima volta che l'ho vista non mi piaceva poi .. è stato amore!
Ho provato a crearla accostando vari colori, ma la preferisco sicuramente con due sfumature della stessa nuance.
 
I am finally, after a long time, to make you see my last Nail Art
I 've made ​​about 10 days ago, but time is short at this time (as you can see are in fact "break" with the ABC Challenge).
It 'a Nail Art I wanted to do for a long time, it's really easy and having an effect, the first time I saw her I did not like then .. it was love!
I tried to create it by combining various colors, but definitely prefer with two tones of the same shade.


Visto che per me la Nail Art era un po' povera, ho voluto arricchirla con le borchiette. Credo che anche con dei puntini neri sarebbe stata molto carina.
Il giorno dopo aver caricato il video ho ricevuto un bellissimo messaggio da una ragazza che mi ha detto di aver provato la nail art e che le era venuta benissimo, sono stata molto felice di questo messaggio.
Con questo è tutto. A presto,ciao!
As for me the Nail Art was a bit poor, I wanted to enrich her with studs. I believe that even with dots blacks would be very pretty.
The day after I uploaded the video I received a beautiful message from a girl who told me to have tried the nail art and she had managed to recreate it very well, I was very happy with this message.
That's all. See you soon, bye!


Black & White Arabesque Nail Art


Salve!
Oggi voglio mostrarvi questa Nail Art che si basa sul contrasto Nero-Bianco.
Non è tutta farina del mio sacco: mi sembra giusto specificare che ho riprodotto una nail art vista in rete,purtroppo non posso citare la fonte perchè non la ricordo.
Quando ho visto questo disegno me ne sono subito innamorata,pensavo fosse complicato da riprodurre ma mi sbagliavo.
Qui sotto trovate il video tutorial.
 
Hello!
Today I want to show you this nail art that is based on the contrast Black-White.
It's not all my bag of flour: it seems fair to specify that I have reproduced a nail art seen in the net, unfortunately I can not cite the source because I do not remember.
When I saw this design I fell in love, I thought it was complicated to reproduce but I was wrong.
Below is the video tutorial.


Per questa nail art ho utilizzato per la prima volta uno smalto Shaka, il bianco. Lo trovo davvero un ottimo smalto, lo userò ancora un po', ma ho intensione di recensirlo!
Sono super impegnata in questo periodo, non ho mai tempo né per filmare né per scrivere post, e sono anche rimasta indietro con l'ABC Challenge! Devo studiare tantissimo in questo periodo, spero di riuscire a conciliare tutto!
Con questo è tutto. A presto,ciao!
 
 For this nail art I used for the first time a Shaka nail polish, the white. I think it's a great nail polish, I'll use some more, but I have intension to review it!
I'm super busy at this time, I never have time to film or to write post, and are also lagging behind with the ABC Challenge!
I have to study a lot during this time, I hope to be able to combine all!
That's all. See you soon, hello!


Strips & Studs Nail Art


Eccomi qui con una nuova Nail Art. Tema di oggi: borchie!
Era da tanto tempo che volevo fare una Nail Art del genere ma non avevo il materiale principale (le borchie appunto). Sul web ci sono molte nail art "borchiate" che però sono state create utilizzando le microperle, le stesse che si usano per la caviar manicure,io invece volevo le VERE borchie!
E chi è giunto in mio soccorso senza preavviso?

Cute Coffee Cup Nail Art

 
Finalmente una nuova Nail Art, e non banale come la precedente!
Avrei voluto fare prima questa rispetto a quella con i Liquid Sand OPI ma non avevo il colore di base. Nella mia mente l'ho pensata esattamente così e sono stata felicissima del risultato ottenuto,è proprio come l'avevo immaginata!
Da dove ho preso lo spunto? Semplice! Ho pensato a questa Nail Art durante il periodo di esami (periodo in cui bevo tantissimo caffè!).
 
Here is a new Nail Art, and not trivial as the previous one!
I wanted to do this first than with the Liquid Sand OPI but I didn't have the basic color. In my mind I thought exactly that and I was happy with the result, it's just like I imagined!
From where I got the inspiration? Simple! I thought of this Nail Art during the exams period (the period when I drink a lot of coffee!).

Nail Art with Liquid Sand

 
Sono tornata!!!
Ebbene si, questa nail art è la prima del mio ritorno come "tutorialis" su You Tube (mettiamolo tra virgolette perchè non sono proprio nessuno xD).
E' una nail art molto banale,sia come idea sia come realizzazione (infatti sono ancora indecisa se metterlo o no su You Tube) però l'effetto mi piace molto,se potete consigliatemi!
Che dire di questa nail art? Sto un pò in fissa con i Liquid Sand, ma si era già capito.
 
I'm back!
Yes, this nail art is the first of my return as "tutorialis" on You Tube (let's put it in quotes because I'm nobody xD).
It 'a very trivial nail art, both as an idea and as a realization (that are still undecided whether or not to put it on You Tube), but I really like the effect, if you can Advise me!
What about this nail art? I'm a little obsessed with the Liquid Sand, but we already knew it.
 

St.Valentine Nail Art


Sabato e domenica la pagina facebook di Zoya Colors ha indetto un mini concorso di nail art con tema San Valentino. Avendo un' oretta libera ho provato a fare una Nail Art per l'occasione.
E' stato bellissimo e bruttissimo tornare a impugnare un pennello dopo 3 mesi: la prima perchè mi mancava tantissimo la Nail Art, la seconda perchè i miei movimenti non sono fluidi come prima. Spero che sia solo questione di allenamento e che tutte le persone che mi dicono "non preoccuparti è come andare in bicicletta, tornerai come prima" abbiano ragione.
 
Saturday and Sunday the facebook page of Zoya Colors has announced a mini nail art contest themed Valentine's Day. Having a 'free hour or so I tried to make a Nail Art for the occasion.It was beautiful and ugly return to gripping a brush after 3 months: the first one because I was missing a lot nail art, the second because my movements aren't fluid as before. I hope it's just a matter of practice and all the people who tell me "don't worry it's like riding a bike, you will return as before," they're right.
 

Snake Skin Nail Art

Salve!
Stavo riguardando le foto delle mie vecchie nail art e mi sono ricordata di aver cancellato un tutorial che mi piaceva molto per problemi di copyright. Che potevo fare se non rifarlo!?
All'epoca (e anche ora,in realtà) lo chiamai "Snake Skin" ovvero "pelle di serpente" perchè è ciò che mi ricorda. In questi giorni, però, molte persone mi hanno detto che ricorda le squame di un pesce,alcune addirittura che ricorda la coda della Sirenetta.
A me piace moltissimo ed è facile da realizzare, non è necessaria alcuna manualità o attrezzi particolari. 
Ho ciarlato abbastanza vi lascio alle foto,fatemi sapere se vi piace e, soprattutto, cosa vi ricorda.
 
Hello!
I was re-watching photos of my old nail art and I remembered that I removed a tutorial that I really liked for copyright issues. What could I do it again!?
At that time (and even now, actually) called him "Snake Skin" because it is what I think. These days, though, many people have told me that it seems the scales of a fish, some even reminiscent of the tail of the Little Mermaid.
I love it and it is easy to implement, requires no special tools or manual.
I chatted enough,I leave you to the photos, let me know if you like and, more importantly, what you seem.


Vi lascio qui il link al tutorial   *   I leave here the link to the tutorial
 
 
Ciao!   *   Bye!


Orly Nail Art for Everyday

La settimana scorsa ho postato le foto ed una piccola review dello smalto Prince Charming di Orly, ed ora volevo mostrarvi la nail art che ho realizzato su quella base.
Anche se ho fatto la nail art lo stesso pomeriggio della pubblicazione del post, ci ho messo parecchio tempo a pubblicare sia questo post che il tutorial sul canale You Tube. Il motivo? Il clima! Ha piovuto in questi giorni e non riuscivo a trovare un raggio di sole per fare due foto decenti (infatti mi sono dovuta accontentare di pochissimo sole).
Ma, come al solito, bando alle ciance,ecco le foto!
 
 
Last week I posted pictures and a small review of Orly Prince Charming nail polish, and now I wanted to show you the nail art that I made on that basis.
Although I did nail art on the same afternoon of the publication of the post, it took me a long time to publish both this post and the tutorial on You Tube. The reason? The weather! It has been raining these days and I couldn' t find a ray of sunshine to make two decent pictures (in fact I had to make do with very little sun).
But, as usual, without further ado, here are the pictures!
 

Ecco qui sotto il video del tutorial.

Here below the video tutorial.


Sapete qual'è la particolarità di questo tutorial? Ho usato solo oggetti che si possono trovare in casa, niente pennelli o dotter che non tutti hanno.

Do you know what is the peculiarity of this tutorial? I've only used items that you can find in the house, no brushes or Dotter that not everyone has.

 
Spero che il tutorial possa esservi utile. A presto!

I hope that this tutorial will be useful. See you soon!

Back to School Nail Art

Agosto è finito e anche il clima ci ricorda che tra poco dovremo tutti tornare alla solita rutine: scuola,università o lavoro.
Ad agosto anche io,sul canale You Tube e qui sul blog, mi sono presa una pausa (meritata o meno, questo non lo so) e per l'intero mese non ho preso in mano né pennelli né smalti. Per questo motivo, appena tornata,la voglia di creare e decorare era fortissima ma la fantasia un pò scarsa (il cervello era ancora a mare!). Dopo qualche giorno mi sono fermata a pensare a cosa mi aspetta tra poco: l'inizio di un nuovo anno universitario e ho deciso di incentrare su questo argomento la mia nuova nail art!
Ho cercato di creare una nail art allegra per il "Back to School" , piena di colore!

Ed eccola qui!
 
 
August is over and the weather also reminds us that soon we will all return to the usual rutine: school, university or work.
In August, me too, on You Tube channel and here on the blog, I took a break (deserved or not, I don't know) and for the entire month I didn't take in hand brushes or nail polish. For this reason, when I got back, the desire to create and decorate was very strong but the fantasy a bit low (the brain was still at sea!). After a few days I stopped to think about what to expect soon: the beginning of a new academic year and I decided to focus on this topic my new nail art!
I tried to create a cheerful nail art for the "Back to School", full of color!

And here it is!
 
 
Com'è facilmente intuibile mi sono ispirata al materiale scolastico: pastelli e quaderni.
Spero tanto che vi piaccia.
Buon inizio a tutti!
 
How easy to see I was inspired to school supplies: pencils and notebooks.
 
I really hope you like it.
Good start at all!
 
Tutorial: http://www.youtube.com/watch?v=kTyZecpl7mo
 

Dreamcatcher Nail Art • Acchiappasogni

Ogni due mesi la rivista Love Nails "propone" un tema per le nail art: chi vuole può crearne una (seguendo il tema,ovviamente) e spedirla alla redazione che ne sceglierà alcune per farle apparire sul numero successivo della rivista. Questa volta il tema erano I Sogni.
Ho deciso subito che avrei voluto cimentarmi nella realizzazione di una Nail Art!
Ho trovato,però, il tema abbastanza difficile poiché mi immagino i sogni come qualcosa di etereo,liscio e soffice,con un buon odore di fresco e di fiori e con tanta luce. E' abbastanza difficile rappresentare tutto ciò quindi mi sono "allontanata" un pò. Ed eccolo lì,che penzolava sopra la mia testa poggiata sul cuscino...

Every two months the magazine Love Nails "suggests" a theme for nail art: who wants to can create one (following the theme, of course) and mail the editorial office which will choose some to make them appear on the next issue of the magazine. This time the theme was Dreams. I decided immediately that I wanted to venture into the creation of a Nail Art! I found, however, the issue hard enough because I guess the dream as something ethereal, smooth and soft with a pleasant smell of fresh flowers and with so much light. It 's quite difficult to represent all this so I "removed" a little. And there it was, hanging over my head resting on the pillow ...

Ho questo acchiappasogni da molto tempo e ci sono affezionata perchè racchiude tanti bei ricordi,così mi sono decisa e per il tema "sogni" ho ricreato questo oggetto. Mi sono ispirata molto anche per i colori (una volta le piume erano blu sulla punta) e sono rimasta soddisfattissima del risultato.

I have this Dreamcatcher for a long time and I have affectionate because it contains so many beautiful memories, and so I decided the theme of "dreams" I have recreated this object. I also really inspired for the colors (once the feathers were blue  on the head) and I'm definitely satisfied for the result.

Tutorial: http://www.youtube.com/watch?v=kcU5r-6ojSs

Purtroppo il giorno che ho creato questa nail art non c'era il sole e non ho potuto fare le foto fino a due giorni dopo. Il termine per mandare le foto alla rivista era, però, già passato. Pazienza sarà per la prossima volta! Ciao!

Unfortunately the day I created this nail art there was no sun and I could not take pictures until two days later. The deadline for sending the pictures to the magazine, however, was already gone. Patience will be for next time! Hello!

Related Posts Plugin for WordPress, Blogger...